Wednesday, December 15, 2010

Christmas Pillow

A Christmas Pillow for my couch. Just for fun!
I used the free December embroidery design from Embroidery Library.
And lots of ric rac!

Sunday, December 12, 2010

Trinity's Christmas Pillowcase

Trinity loved her new pillowcase! She loved the $5.00 bill even more. What girl doesn't love money!

Sunday, November 28, 2010

Two Christmas presents completed!


My niece's Christmas quilts. Quilted, bindings and labels. The quilts are from this summers Jelly Roll Sampler Quilt Along with Moose on the Front Porch. I used  Laurel Burch quilt labels. The quilting definitely pulls it all together. I used a striped bias binding and flannel on the back. Two cozy quilts for Christmas!

Saturday, November 27, 2010

A little Christmas decorating

I found this beautiful handmade ornament at  http://www.northernkeepsakes.com/Ornaments.htm I adore it!
I have finished my nieces Christmas quilts and will have pictures of them soon. Life has been busy, but I am getting comfortable with my new job, which makes it all less stressful. Now to catch up on my sewing and maybe a little cleaning and decorating. I'll have to check my priorities :-p.

Saturday, October 16, 2010

Halloween Fun

Halloween pillow case for a little friend. The font is from my embroidery software, called Quiver (so appropriate). I also made use of my decorative stitches and a varigated rayon thread by stitching stars along the top edge of the pillowcase band. I think my six year old friend will love it and I had alot of fun making it!

Sunday, October 10, 2010

Fleece Baby Blanket

I finally found time to sew! I made this blankie with a pink piggy applique for a friends new baby. Fleece is so snuggly and durable. Both good qualities for a favorite blankie. If you look real close you can see that I serged the edge of the doubled fleece with a sparkly thread for just a little bling! Hope everyone is enjoying the cooler fall weather!

Wednesday, October 6, 2010

Blogging Break

Hi, Just checking in to let everyone know that my new job is getting in the way of my blogging and sewing. Hopefully I can get back to the good life soon. I just completed my Pediatric Advanced Life Support class and will take the Adult version in November. Lots of studying required so will check in when I can. Happy Fall!

Monday, September 6, 2010

Eden Jelly Roll Quilt


Love this fabric! This is my second Jelly Roll Sampler Quilt Along quilt finish. I will be sending both off to my LAQ this week. Soon I will have two Christmas gifts completed. I don't think I have a favorite between the Eden and the Verna. Hope my nieces love their Christmas gifts!

Sunday, September 5, 2010

Labor Day Weekend


The 34th annual Colorado Balloon Classic!
That's Pikes Peak right below the balloon.
We had the best weather this year for the balloons.
The boys had a great time this weekend too!


Hunting bunnies requires great concentration!

Sunday, August 29, 2010

Verna Jelly Roll Sampler Quilt Border on and My New Quilt Rack

Yeah! I got the border on my Verna quilt and I am displaying it on my latest garage sale treasure. Three dollars for this nice heavy iron quilt rack. I think I made a great buy!
My new job is keeping me busy. I am studying all about Radiology Nursing. It is pretty exciting with lots of new experiences. I have a lot to learn before I feel comfortable there.
I really like the green magnolia border from the Verna line. It is just what I wanted for my 21 year old niece.

Sunday, August 22, 2010

My Verna Quilt for the Jelly Roll Quilt Along

Just need to add the border. I have ordered some apple green for it. This is a Christmas present for one of my nieces. Love the colors in Verna. I had a great time doing the Jelly Roll Sampler Quilt Along. Konda of Moose on the Porch Quilts did a great job. I loved the blocks coming out every two weeks. I could keep up and still felt like the quilt was getting done. I still have my Eden jelly roll sampler quilt to finish. I will show pictures of it soon, hopefully.
I started hospital orientation for my new job last week. This week I will actually be in the unit learning my job. I am glad it is only part time. It is really cutting into my sewing time. I am excited about having a pay check though. More  money for fabric!

Sunday, August 15, 2010

Yoyo improvements on my lunch bag

I didn't think the previous yoyo was big enough for it's stem and leaves so I made it larger and added a button. I like it much better now.

Saturday, August 14, 2010

My new lunch bag for my new job!

I made this lunch bag using a tutorial from the Pink Penguin. I think it turned out really nice. It has a vinyl lining in case of spills and a Cordura nylon base so it wont pick up messes from the frig at work. The top has a draw string cover to keep my lunch contents hidden from view. I lined it with fusible batting and the vinyl was backed with a poly batting. It isn't really insulated but will keep it cool until I place it in the frig at work. My embellishment was a little yoyo flower with wool leaves. The embroidery I actually did on the sewing machine using the double stitch to look like backstitching. My inspiration for little flower came from this book.
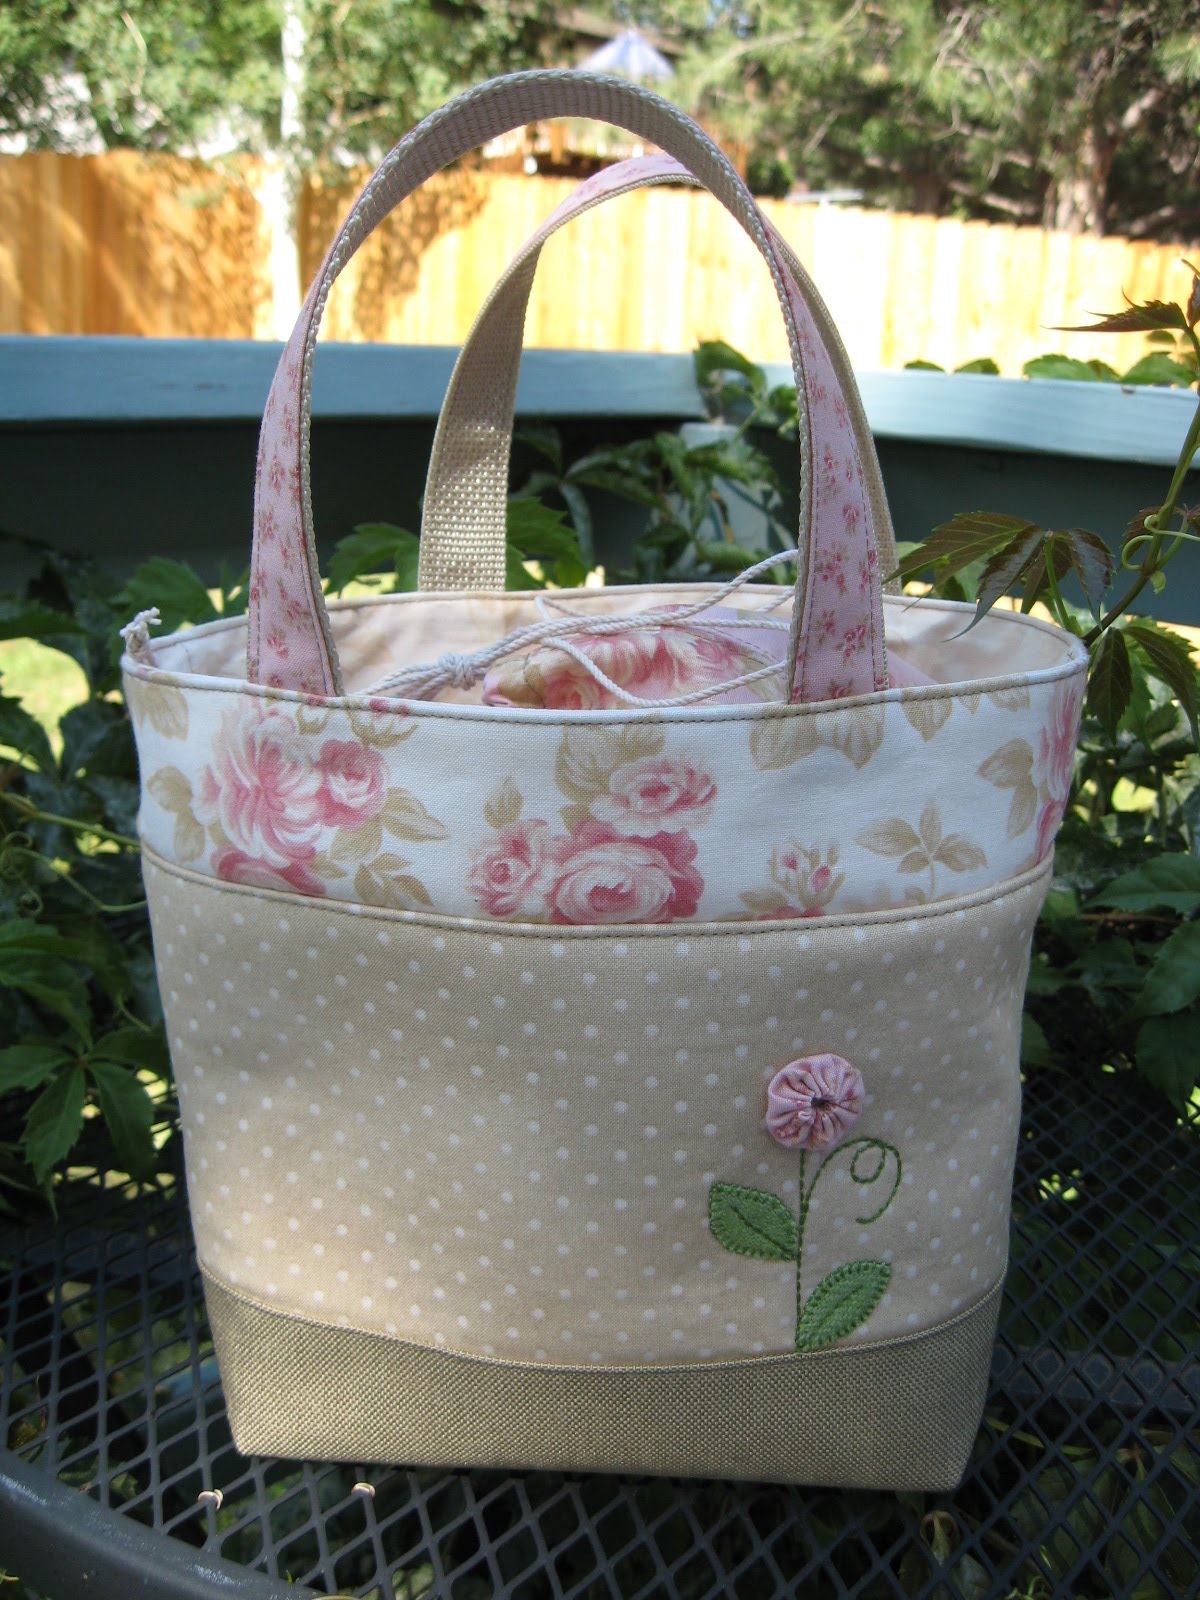
This is a really cute book with lots of nice gift ideas. I really like the look of hand stitching but if I can duplicate it on the sewing machine that's my choice for doing it. Hope you like my show and tell for Lush Friday. I know I didn't get it done till Saturday, but it's ready for my first day of work Monday!

Monday, August 9, 2010

Hayden's Bug Jar Quilt Finished!


Hayden's Bug Jar Quilt after washing. It turned out very nice! I washed it in cold water and dried it in the dryer on medium heat until almost dry. The vinyl wrinkled just a bit when the fabric pulled in a little. It probably isn't the snuggliest quilt but it is very cute for a three year old boy.

Thursday, July 29, 2010

Hayden's Bug Jar Quilt

My Lush Friday show and tell. Click on the button on the sidebar to view more Lush Friday show and tell. Great inspiration!

The blocks for Hayden's Bug Jar Quilt are all embroidered and  framed.  If you look closely you can see that each jar has vinyl to represent the glass. Click on the photo to enlarge it. I love the bright colors for the whimsical embroidered bugs. The first block shows the sashing. There will be another border and probably piping next to the binding. Hayden (my great nephew) is 3, so I think he will appreciate the bright colors and funny bugs. My favorite part of quilting is watching it all come together. See, all the mess below is worth it. I have most of the thread put away and I am working on the fabric stash!

Tuesday, July 27, 2010

Sewing is Messy!

This is how my sewing room looks when I am in the middle of a project. The fabric stash and the thread stash are out for my rummaging. That's my cutting table in the corner. I just push everything to the side so I have a bit of room to cut (or I go out to the kitchen table). The second picture shows both embroidery machines working hard.

I just thought it would give everyone a giggle to see my mess in all its glory! I am oh so glad I have a door to my sewing room especially when my mother comes to visit. LOL Hope you have a good giggle on me!

Good news...I start my new job on August 16 so I still have time to finish my nephews quilt. I will be working in the Radiology Nursing Unit per diem. I will be monitoring patients and giving sedation/pain meds while they have procedures done. Thanks for wishing me luck getting this job. It will stimulate my brain some I am sure. And, I'll have more money to buy more fabric!!!

p.s.  I am much tidier and organized at work, I promise.

Sunday, July 25, 2010

Friday Night Sew-In

Well, I got off to a slow start for the FNSI. Actually I didn't get started till Saturday. I've been sewing and sewing (embroidering really).  Life got in the way this week. My daughter's dog was run over by a van on Tuesday. He was at the vet all day Tuesday, then surgery on Wednesday. I spent half the day at the hospital Tuesday shadowing the nurses in the Radiology Dept.. Now that paid off because I got the job I have been trying for. Yahoo! However, also on Tuesday it poured rain, right into our basement via the window well. It also poured rain in my daughter's house via the doggy door. So here is what I have managed to sew on my nephew's quilt.

Tuesday, July 13, 2010

My New "Easy on the Back Bag"


I just finished a new bag for myself. It is the "Easy on the Back Bag" by Jenny Raymond. It wasn't the easiest bag to make but I really like the finished product. I made it out of a batik. It really is more purple than blue and has green mixed in. Some of my favorite colors. Now to go add my stuff!

Sunday, July 11, 2010

Chicken Pot Holders


I have had a lot of inquiries about the chicken pot holders I made, so I am posting a link for the pattern. Have fun everyone.
The link at Nancy's Notions for the chicken pot holder: http://www.nancysnotions.com/product/id/147859.do

Thursday, July 8, 2010

Watermelon and Family Reunion


The watermelon table runner is for The Quilted Table July challenge. I love the way it turned out. The pattern is at allpeoplequilt.com.
We made it back from Kansas where we went for our family reunion. The first day was HOT and WINDY. The second day was better. Overcast and just a breeze. We had a great time visiting with family and picnicking.  Our family reunion is held every three years. We have an auction to help pay for the food and treats. I donated my red chicken potholders. They made around $30.00 for each pair. I thought that was a fair price. My husband who is known for his beef jerky and who usually brings in a lot of $$ at the auction selling it, greatly disappointed the crowd when he forgot it at home! He was then required to contribute $$ to make up for what he didn't make selling his jerky. Oh well!
Here are the home made knitted dishcloths I scored for $11.00. They are really nice! I got lucky too because the second batch of dish cloths went for $30.00. 
 Still no word on the job I applied for. Hope you are having a great summer.

Sunday, June 27, 2010

Shoe bag with wrist strap

Another shoe bag. This one is for my daughter. I added a detachable wrist strap so that she can carry the bag easier if her suitcase gets too full for her shoes. This one is also made of pre quilted fabric. The pre quilted fabric gets a little thick in places for my serger. I am not sure that there is an advantage to the thickness of the fabric for a shoe bag. It does make it look nice though. However, it would probably fit better in the suitcase if the material were thinner. We'll have to see what works best.

Saturday, June 26, 2010

EQ7 Photo Fun

Have you played on the new EQ7 image worktable? This creates all new opportunities for quilts! Doesn't it make Bailey's tongue look cool?
This one looks like a flower in the middle. Fun!

Wednesday, June 23, 2010

Bloom Pillow

This is such a cute pillow. It is a pattern by Nancy Halvorsen from her book. Very simple fusible applique. I picked up the kit at the Great American Quilt Factory when I was in Denver a couple of weeks ago. The kit made it so easy to put together. Today I finally got the buttons on. It should have been out for Spring.  I am going to leave it on the couch for awhile anyway.

My job interview went well yesterday, I think! I should know whether its mine or not by the end of next week. Hopefully I don't have intense competition :-) I am ready to get back to nursing after being out for 7 months.

Welcome to all my followers. Thanks for tagging along with me. I love comments too.

Tuesday, June 22, 2010

Some of My Favorite Things

A rose growing in my backyard. One of my favorite colors.

My happy Bailey.

Thursday, June 17, 2010

New shoe bag with metal tape measure closure


I made this shoe bag for my stepdad for Father's Day. It is made with prequilted fabric and I embroidered his initials on it. It turned out really nice. Can't wait to see his reaction when I give it to him Sunday. We are all going to Red Lobster for Father's Day dinner! Click on the pictures to zoom in so you can see the details. See the tutorial below and leave comments!
Look what the UPS man delivered yesterday. I am having alot of fun learning my new software!

I have a job interview Tuesday! Wish me luck!

Friday, June 11, 2010

My First Tutorial: A Shoe Bag made with a repurposed metal tape measure.


My DH gave me an old metal measuring tape from his garage. You can see that it has issues! I wanted to try making a bag using the snappy action of the metal tape to keep it closed. I have been wanting to write a tutorial too, so this is what I came up with! Hope this gives you ideas for Christmas presents. I think shoe bags will be great gifts for those on my gift list who have everything.
This is a picture of the finished bag . I used my embroidery machine to monogram it. You could add any kind of embellishment.  My bag is kind of boring. Next time I will use brighter colored fabric or maybe a fancy embroidery.
The next picture shows some of the supplies you will need. A half yard of home dec weight fabric, old measuring tape, Scotch tape, 1/4" wash away tape, rotary cutter, mat and ruler, old scissors to cut the metal tape with, non permanent marker, thread, sewing machine and serger if you have one, and embellishments of your choice.                        
                                                                                                                                                                                               

This is great stuff! Wash Away Wonder Tape by Dritz.


First cut your fabric 141/2" wide by width of fabric, selvage to selvage (about 41-42 inches). I have mine folded in half.                                                                                            
Next mark the fabric for placement of your monogram or other embellishment. Mine is 8 inches down and centered on the front half of the fabric.
Embellish as desired.                                                                                             Then finish the top edge of both the front and back of your fabric with a 4 thread serged edge or zig zag stitch.                                          
Next fold down the top edge 1 and 1/4" on both front and back. Iron it to make a crease as shown on left. Take a piece of your Wash Away tape and place it along the top edge, front and back. Leave the paper on the tape for now.
 Cut your metal tape 131/2 inches long and round the edges on both ends. Cut two. Place one tape next to each fold, centered, and tape in place on each end with the Scotch tape (see photo below). Your metal tapes should be facing the same direction so that when the bag is closed they will spoon. In other words, the metal tapes have a curve and the front of one tape should be curved around the back of the other. Now peel the paper off the Wash Away tape and fold the flap down to make a casing, covering the metal tape. The Wash Away will hold the flap down. The Scotch tape will hold the metal tape in place away from the needle when you sew the casing down, which is what you need to do now.                                                                                                                                                                                                            Sew 1/4 inch from the flap edge, both front and back.  Make sure you know that you will not hit the metal tape. Leave the Scotch tape in place to continue to hold the metal tape in place.

                                                                                                                                                                                                                                                                                                                Iron a crease at the bottom fold of your fabric. Turn the fabric right sides together with the top edges meeting. Next you need to bring the creased bottom fold up into the middle of the front and back by 3 inches.  See photo below (enlarge it by clicking on it). This fold will create the flat bottom of the bag when sewn (next photo).Now pin and press this fold. If you will be serging the sides closed be sure and pin away from the edge so your cutting blades will not hit the pins. Serge or sew carefully along both long sides. Check the placement of the metal tape before you serge/sew next to the top (where the metal tape is). I started from the bottom and sewed to the top. I cut off only about 1/4" when serging.
Serge a tail then tuck the tail into the seam or just backstitch with your sewing machine. Ta da! You have a very nice shoe bag with a snappy closure, easy to pack into your suitcase. Hope this is a fun project for you! Let me know if any part of this tutorial is unclear.